Saturday, October 8, 2011
late night cake
(savory) apple ideas
 Is there anything better than an early start to a weekend morning...big cup of coffee and something inspiring in the paper? This morning I tore out Mark Bittman's ideas for apple recipes from the New York Time's Magazine. Here is the article. (If you can't see the link for some reason simply search for "Mark Bittman Recipes: Baked, Sautéed, Fried or Roasted Apples".) I cannot wait to make either Moroccan-Spiced Roasted Apples or Brussels-Sprout-Sage Sauteed Apples. Hadn't thought of using apples in a savory way...
more lunchbox ideas
 Trader Joe's probiotic yogurt smoothie + a little local apple + mini whole wheat bagel with Trader Joe's pumpkin cream cheese (decadent-- basically cream cheese frosting, found in the dairy case....) + chunks of cheddar cheese + grapes + a pear-raspberry Earth's Best Whole Grain bar as a treat (as if the pumpkin cream cheese wasn't enough!!)
 whole wheat tortilla "pinwheels" stuffed with plain cream cheese and jam + cucumbers + Applegate brand salami + a cup of apple sauce + "rainbow" carrots (check your local market to see if you have this seasonal version of carrots)
Tuesday, October 4, 2011
homemade vegetable soup + my new food crush: wholeG bread

My husband and older son returned from their "Y Guide" camping trip, full of excitement. Really, what could be better than heading off for a special weekend with dad, filled with canoeing, hiking, arts & crafts, romping around the campfire with other kids well past normal bedtimes-- and more junk food than a 3rd grader could ever imagine eating in 24 hours? I wasn't sure exactly what I was going to end up making for Sunday dinner, but a quick trip to our local market resulted in a cart full of fresh veggies. Subconscious? Probably not. The end result was a super simple vegetable soup that was absolutely delicious...and offset some of the junky wonderfulness of the weekend camping trip with dad.
Homemade Vegetable Soup
I've listed amts of the various vegetables here but you can modify them however you'd like, depending upon your family's tastes + how much soup you'd like to make. My pot made 6 pints to share with friends or freeze + dinner for 4 two nights in a row...
5 Rapunzel brand vegetable bouillon cubes + 10 cups of water
1 pint cherry tomatoes (left whole)
1/2 large onion, minced
1 T garlic (i used Dorot brand frozen)
2 T basil (i used Dorot brand frozen)
2 medium sweet potatoes, peeled & chopped
3 medium-sized red bliss potatoes, skin on, chopped
1 smallish butternut squash, peeled and chopped
2 small zucchinis, chopped
1 red bell pepper, chopped
1 can artichoke hearts (in water), chopped
1 can butter beans (rinsed)
1 can white beans (rinsed)
1 head of broccoli, chopped
There's a lot of chopping involved, which takes time. But this is a great recipe to make if your kids are in the kitchen wanting to catch-up on their day.
I started by filling a large soup pot with water, the bouillon cubes, the whole cherry tomatoes, minced onion and the frozen cubes of garlic and basil. I find keeping those frozen herbs on hand convenient because I always have them on hand and can just pop them into any recipe. While waiting for that to boil, I chopped the sweet potatoes, red bliss potatoes and butternut squash into 1/2 inch pieces, because those were going to take the longest to cook. As soon as they were chopped, they went into the pot. This took some time and elbow grease, so by the time they were all in the pot the veggie broth was boiling. I lowered the heat a little bit and then added the zucchini and bell pepper, once they were chopped into 1/2 inch pieces. A quick check of the pantry resulted in artichoke hearts, butter beans and white beans, so a can of each of those went in. (I rough chopped the whole artichoke hearts before tossing them into the pot.) Then last to go in was the broccoli, since I wanted the broccoli blanched not soggy. Really, the broccoli went in right before I served the soup. From start to finish, the soup took about 45 minutes because of all of the chopping. Relatively speaking that's a long time for me to spend cooking a meal. But, it's one of those meals that just gets better with time. So, spend a little extra time making one big pot and you'll get to enjoy this soup over the next few days, or freeze it for a night when you're running around to after school activities but still want to come home to a warm, comforting, heathful meal.
That first night (and again last night) I served the soup with a variety of stinky cheeses and chunks of a local bread that I stumbled upon that immediately became my latest food crush: G Whole German Bread. Local folks can find this New Haven-baked bread at Walter Stewart's Market. It is amazing. We tried the "Fitness Bread" in the green bag (which is loaded with corn grits, oat flakes, flaxseeds, soybean bran, sunflower seeds, and more...) and the "Muesli Bread" in the yellow bag (which is made with raisins, golden raisins, hazelnuts, sunflower seeds, pumpkin seeds, oats, sesame seeds and more). I am not sure how widespread their distribution is, but found this article on them if you want to learn more about this new bread company. I might just have to make more soup to go with this bread.
Monday, October 3, 2011
banana-chocolate chip-chia seed muffins
 I woke up early last week to bake mini banana-chocolate chip-chia seed muffins for a class coffee at my children's school. Seeing a sign-up sheet for paper goods, flowers, set-up or baked goods, I'm a sucker for the most laborious of the bunch. This is a little problem I've got. And so, that morning I found myself baking. It's not that I particularly like baking, in fact I'm not much of a baker. But there's this (achem, self-perpetuated) assumption that since I can cook, I should. And so, I arrived with a tray of tender little muffins. And they were good, well worth the early morning baking session. But, I give myself a little pat on the back for quickly nabbing a beer offering on the sign-up for the next parent gathering...
Banana-Chocolate Chip-Chia Seed Muffins (or loaves) From Scratch
(makes 12 muffins, 24 mini muffins or one 8" loaf)
(makes 12 muffins, 24 mini muffins or one 8" loaf)
1 1/3 cups all-purpose flour
1/2 teaspoon baking soda
1/4 teaspoon baking powder
5 1/2 T unsalted butter, softened
2/3 cup Turbinado sugar
2 eggs
2 bananas, mashed
1/2 cup chocolate chips
1/2 cup chia seeds
Preheat the oven to 350. Grease a loaf pan or line a muffin tin with paper cups. Whisk flour, baking soda and baking powder together in a small bowl. In a second bowl, beat the sugar and butter together with a hand mixer until creamy. Add the flour mixture until blended then beat in eggs, banana, chocolate chips and chia seeds. Pour batter into prepared pan and bake: 45-55 minutes for a loaf; about 18 minutes for regular-sized muffins; or about 12 minutes for mini muffins. Check to make the muffins or bread are done by inserting a wooden toothpick in the center, making sure it comes out clean.
Now you've got my go-to recipe for banana bread and/or muffins. But then I realized I hadn't gotten a photo of the muffins before bringing them to school. So, I baked a second batch this weekend (the loaves pictured above), this time using my tried and true TJ's banana bread mix + a fresh banana in each loaf. Just as good (I think) and a tad bit easier to throw together:
Banana-Chocolate Chip-Chia Seed Muffins (or loaves) With the Help of a Mix
(makes 12 muffins, 24 mini muffins or one 8" loaf)
(makes 12 muffins, 24 mini muffins or one 8" loaf)
1 package of Trader Joe's Banana Bread Mix (nut-free)
2 eggs
1/3 cup vegetable oil
3/4 cup water
1 banana, mashed (optional)
1/2 cup chocolate chips
1/2 cup chia seeds
Preheat oven to 350. Grease a loaf pan or line a muffin tin with paper cups. Combine mix, eggs, oil, water, mashed banana (if adding), chocolate chips and chia seeds in a large mixing bowl and beat with hand mixer until blended. Pour batter into prepared pan and bake: 45-55 minutes for a loaf; about 18 minutes for regular-sized muffins; or about 12 minutes for mini muffins. Check to make the muffins or bread are done by inserting a wooden toothpick in the center, making sure it comes out clean.
 Chia seeds are one of the "hip" ingredients you hear about a lot these days. I experimented with them this summer, whipping up a raw chia pudding which 3 out of the 4 of us liked. It wasn't pretty to look at (unless you like grey, gloppy things), but it tasted good and almost had the texture of tapioca. When chia seeds are soaked they become gelatinous in texture, hence the reason you can make "pudding" from them simply by adding nut or soy milk, some sweetener and a splash of vanilla and letting it sit for a few hours. Pretty neat. I'm happy to post that recipe too, if your package of chia seeds doesn't already have it there for the asking. As for the chia seeds, I find mine at our local Whole Foods. They are gluten free, if that is important to you, and according to the Foods Alive package, "chia seeds were used as a staple food alongside corn and beans by the ancient Aztec , Incans and Mayans. Known as the running food, they would eat this high energy endurance food mixed with water...chia seeds have a mildly nutty flavor...omega-3 essential fatty acids, calcium, protein, anti-oxidants and dietary fiber are just a few of the vitamins and minerals this little seed packs for a nutritional punch...." Of course adding them to banana-chocolate chip muffins doesn't transform the muffin from treat to superfood...it just makes the treat have a little more texture and interesting nutritional boost!
Sunday, September 25, 2011
two lunchboxes from last week
 ham & cheese quesadilla in a whole wheat tortilla (cooled to room temp before packing so it didn't get soggy) + slices of red pepper (aka "swords) + whole wheat rotini (leftover from the night before, a favorite finger food of his) + organic applesauce cup (and spoon) + a bag of Annie's organic bunny fruit snacks, as a special treat for the first day of lunch bunch
 cream cheese & jam sandwich on whole wheat bread (cut with a large cookie cutter) + steamed broccoli and slices of red pepper + fresh strawberries + a Chobani Champions Greek yogurt cup + a squeeze cinnamon applesauce + a ClifKid "ZFruit Rope" as a treat
Friday, September 23, 2011
pizza with a tiny purpose
 Last winter break, we were making our way back up north from Williamsburg & Washington D.C., when lo and behold, what did we spot at a Maryland rest stop?! None other than the "pizza mobile"!!! To say that my boys were excited would be an understatement. My older son played it cool, staying in the car. (But I'll be the first to tell you he's now got a Laughing Pizza sticker (permanently) adhered to his "office" window. Teenage lead singer, Emily, gave it to him that fateful day...) And thankfully, everyone appeared to be in line at Starbucks and not pulling out just then because my younger son went zipping off through the parking lot, squealing at the sight of Emily. Those who have little ones in the Fairfield County, CT or Westchester, NY area and are not yet well versed in "the pizza dance" take note: Laughing Pizza is putting a benefit concert on at Wee Burn Beach Club this Sunday from 2-5pm, rain or shine!! The family event is being hosted by, The Tiny Miracles Foundation, a non-profit that is near and dear to our family. Now, I'm no dancer...but you just might see me doing the pizza dance alongside the boys this weekend.
Online ticket sales go through Sunday, 9am. You can also try to get a ticket at the door. Here are the concert details. Come join us!!!
Wednesday, September 21, 2011
A New (Creamy, Smooth) Beans & Greens Soup
 Last winter, I made a fabulous, easy "beans & greens" soup. Yesterday I made up another version that might have even been better. Well, maybe not better, but it was enjoyed by everyone in our family and I am thinking it was due to the last step, when I blended the soup into a creamy puree. I had green soup on my mind when I did my marketing the day before. I think it was last weekend when I read an article about one woman's venture into satisfying green soups. (I'll have to dig up the article...) We all know leafy greens are good for us. And when the weather turns brisk and drizzly there's nothing more satisfying than soup. I like soups, my kids don't love them. My motive for coming up with a health and protein-packed soup that they actually like stems from the fact that both kids have already missed a day of school because they were sick. After a summer of chicken nuggets and other junk from snack bars, it's time to get back to nourishing meals when we're at home.
  The "recipe" (if you can even call it that, because it's so simple):
A New Beans & Greens Soup
(makes a giant pot, at least 12 servings)
(makes a giant pot, at least 12 servings)
1 lb dried navy beans, soaked*
8 cubes Rapunzel brand vegetable bouillon
16 cups of water
2 T frozen garlic, or a few cloves (minced)
22 oz (two large boxes) kale or other leafy greens**
optional: chicken sausages, sliced (see my notes at the bottom photo)
Bring the water, bouillon cubes and garlic to a boil. Add soaked beans and cook over a medium simmer until the beans are tender (about 1 hour). During the last few minutes of cooking, add the leafy greens and cover. Let the greens wilt and stir them into the soup.
The soup is done, your kitchen will smell fabulous and you can sit down and enjoy the soup as is-- very chunky. Or, as you'll see in the photos below, you can blend it until smooth. You can either do so using an immersion blender (which I don't have), or you can let it cool down and run it through a regular blender, until desired consistency. This soup freezes beautifully, so making a big pot and setting some aside for a busy night is ideal.
*I quick soaked the beans, because I had not planned ahead to make soup. The method for quick soaking beans is to bring 1lb of beans to a boil for 2 minutes, in 10 cups of plain water. Then turn the burner off, cover the pot, and let the beans soak for 10 minutes. Drain and proceed as you would with beans soaked overnight.
** Our local Whole Foods has many convenient packages of greens these days. Yes, they cost more. But....if their convenience encourages you to use them in your cooking, then I think they're worth it!
 I first served the soup to the kids as is, plus I added some whole wheat rotini I had leftover in the fridge to their bowls before heating them. My little one had a hard time getting the soup from bowl to mouth without in slopping everywhere and dribbling down his chin...
 I enjoyed the texture and the individual tastes of the beans and kale. But, I did wonder what it would be like pureed...
 So, the next meal, I popped it into the blender...
 and whizzed it around using the pulse function, stopping at this point to check and see if they wanted it a bit chunky still? Nope. They wanted it smooth.
 So, this is where we ended up, and all four of us enjoyed it. I had my bowl vegetarian, or as is. For the kids and my husband, I added a few cooked chicken sausages when blending the soup. They loved this addition. It gave the soup even more bulk, protein from the chicken and a nice smokey flavor.
 Monday, September 19, 2011
Make-Ahead Dinner: Chicken Chili Bake
 Both of my kids are in school five days a week. You'd think I'd be this happy-go-lucky mom, all fit, organized and zen-like. Not quite. In fact, not even close. Despite my best efforts to maintain balance and carve out "me" time while the kids are in school, I am totally failing at it. I look at my calendar of meetings and activities and my head spins. Volunteer work has me tethered to my computer. I'm not sure how I got into this chaotic place, but I am going to have to find my way out. In the meantime, the boys still need me noon or 3pm on, and breakfast, lunch and dinner still need to be made each day. Thankfully, mealtimes are the one area where I feel like I've still got two feet on the ground. Well, I did until I assembled this super simple casserole, went to pop it in the oven this afternoon and the oven would only go up to 100 degrees. So, we are officially down to one working burner and one working oven around here. Fabulous. Stay tuned for raw recipes at the rate that this kitchen is falling apart. Anyway, takeout averted, it was a perfect comforting dinner to end this Monday.
 Chili Chicken Bake
For those of you who like my chicken enchiladas, this is an even easier semi-homemade dinner. Makes 8 hearty portions. Can be assembled and frozen too.
about 1 cup sour cream
8-10 corn tortillas
1 pkg of Bilinski's Chicken Chili (or 2 cups of ground turkey, chicken, beef or tofu cooked in Mexican seasonings...)
1 can black beans, rinsed and drained
a few hearty handfuls of spinach
2 cups salsa (your desired heat level...or tomato sauce if you realize you don't have salsa...)
shredded cheese
Layer the casserole then bake at 350 for approximately 25 minutes, or until warmed through and cheese is golden brown. Can be assembled ahead and frozen. If heating from frozen, double the cook time. Reheats perfectly.
Here's the recipe in action, for those who find it helpful to see it step by step:
 I smoothed a thin layer of sour cream on first (pictured up above, probably a quarter cup total) then placed 4 tortillas, overlapping on top.
 Then the pre-made Bilinski's Chicken Chili. I'm a fan of this company's products, which I stumbled upon in the refrigerated meat case at Whole Foods in Darien. Their meatballs are good too, for something quick to have on hand. You can, of course, saute your own ground meat or TVP/tofu in Mexican seasoning, but the idea was to have this meal be super, super simple, hence the shortcut!
 Then another layer of 4 overlapping tortillas....
 and a few hearty handfuls of baby spinach, which I dolloped with the remainder of the sour cream.
 Tossed on a rinsed and drained can of black beans,
 and then I went to put salsa and cheese on top. Only we had no salsa. So, instead I smothered a jar of sun-dried tomato sauce on top. Probably better, since one of my kids is awfully wary of things being "too spicy" these days. That's the finished product, up top, cooling down. And that's that. A one dish meal, ready to go when we got home, ready to settle in for a family dinner.
Tuesday, September 6, 2011
Back-to-School (Make-Ahead) Breakfast: Baked Oatmeal
 I have to be perfectly honest: I had every intention of coming back from our trip ready to hit the ground. I thought I would have mapped out the perfect back-to-school meals, snacks and lunchbox ideas...carefully planned out how I was going to get that elusive "me" time while the kids were at school...organized all of the articles I've been tearing out and piling up all summer into a tidy binder so I could quickly and easily share new ideas with you all. And the truth is, I spent most of August just enjoying the summer with my kids. Now I'm back, but definitely not focused yet. I can't tell if my head's spinning upon re-entry or if it's just still in (blissful) vacation mode? By the end of the week, both kids will be back in school and I'll probably feel a little bit more organized. But for now, I'm just restocking the fridge/freezer after the week long Hurricane Irene power outage, and focusing on kicking off the new school year on a high note. In that spirit, I wanted to share a new make-ahead breakfast recipe with you all! We gave it a whirl yesterday and it was a hit.
 Baked Oatmeal (with Bananas & Almonds)
based upon Heidi Swanson's Super Natural Every Day's Baked Oatmeal
(makes 8 servings)
butter, to grease the baking dish
2 cups rolled oats
1/2 cup slivered almonds or chopped walnuts
1 teaspoon baking powder
2 teaspoons cinnamon
dash of salt
2 cups milk
1 egg
1/4 cup agave or honey (optional)
3 Tablespoons butter, melted
2 teaspoons vanilla
3 ripe bananas, cut into 1/2" pieces
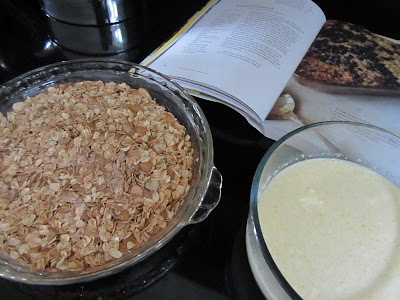 I made this recipe with what we had on hand: bananas and slivered almonds. As such, it came out smelling and tasting like breakfast-worthy banana bread. The original recipe from Super Natural Every Day's cookbook calls for walnuts, bananas and your choice of fresh berries. If you'd like to follow the orig recipe, the steps would stay the same but your measurements would be: 2 bananas on the bottom of the pan + walnuts instead of slivered almonds in the oat mixture + 1 1/2 cups of fresh berries scattered over the top before baking, instead of that last banana. Really, you can use any type of nut you like, and any type of fruit to top it. But the way we made it was really good, so I'd probably just stick with my almond-banana version. Anyway, in the photo above, the bananas have been covered with the oat mixture, and then I am going to drizzle the milk mixture over the oats.
 I did gently tap the baking dish on my counter top, just to make sure the milk mixture moved through the oats. Then I arranged slices of the third banana on top.
 The baking time should be between 35-45 minutes. It took 41 minutes for the top of my dish to be golden brown and the baked oatmeal to set. It's goopey if you serve it right away. Best to let it cool for a few minutes before slicing and serving.
 This is a perfect breakfast to make ahead, and simply reheat slices in the oven or microwave on a school morning. Or, if your new school year resolution is to workout before the kids get up, you could always do the quick assembly, pop it into the oven and let it bake while you workout. The amazing smell wafting from your kitchen as it bakes should get the kids out of bed in time to make the school bus.
Preheat oven to 375. Butter an 8" round or square baking dish. In one bowl, combine dry ingredients: oats, almonds, baking powder, cinnamon and salt. In a second bowl, combine the wet ingredients: milk, egg, agave (if using), melted butter and vanilla. Place a single layer of sliced bananas in the bottom of the baking dish. (Pictured above; I used two of the bananas here and the third banana as the topping.) Cover the bananas with the oat mixture. Drizzle the milk mixture over the oats. You may want to gently tap the baking dish on your counter top, just to make sure the milk mixture moves through the oats. Arrange remaining banana on top. Bake for approximately 40 minutes, or until top is golden and the baked oatmeal has set. Let cool for a few minutes before slicing and serving.
Can be made ahead and slices may be reheated in the oven or microwave, until warmed through.
Here is the recipe in photos with a few of my additional notes:
 I made this recipe with what we had on hand: bananas and slivered almonds. As such, it came out smelling and tasting like breakfast-worthy banana bread. The original recipe from Super Natural Every Day's cookbook calls for walnuts, bananas and your choice of fresh berries. If you'd like to follow the orig recipe, the steps would stay the same but your measurements would be: 2 bananas on the bottom of the pan + walnuts instead of slivered almonds in the oat mixture + 1 1/2 cups of fresh berries scattered over the top before baking, instead of that last banana. Really, you can use any type of nut you like, and any type of fruit to top it. But the way we made it was really good, so I'd probably just stick with my almond-banana version. Anyway, in the photo above, the bananas have been covered with the oat mixture, and then I am going to drizzle the milk mixture over the oats.
 I did gently tap the baking dish on my counter top, just to make sure the milk mixture moved through the oats. Then I arranged slices of the third banana on top.
 The baking time should be between 35-45 minutes. It took 41 minutes for the top of my dish to be golden brown and the baked oatmeal to set. It's goopey if you serve it right away. Best to let it cool for a few minutes before slicing and serving.
 This is a perfect breakfast to make ahead, and simply reheat slices in the oven or microwave on a school morning. Or, if your new school year resolution is to workout before the kids get up, you could always do the quick assembly, pop it into the oven and let it bake while you workout. The amazing smell wafting from your kitchen as it bakes should get the kids out of bed in time to make the school bus.
Wednesday, August 17, 2011
family time
I'm taking August off! I'm reading, gathering recipes, and thinking clearly about how I want to feed and nourish my family this coming school year. Once the kiddos get back on a school routine, I'll get back to writing. In the meantime, we're busy climbing mountains, collecting bugs (them, not me), reading (lots), riding bikes and enjoying these last few weeks of summer together. I look forward to continuing to share my ideas for simple, healthful, family-friendly recipes with you all again in Sept!
If you want to be in the loop when I start writing again, feel free to subscribe to full plate and my posts will come to you via email. You can do so by scrolling down right under the photo of the kids making pizzas here on the right hand side. (Don't forget to check your inbox for a confirmation email from feedburner.)
And, even though there won't be any new recipes the rest of this month, you can always scroll down the right sidebar here and get recipes by type, or search for something specific like lunchbox ideas or where I get the containers that go into our lunchboxes...timely things like that. Plus, since I'm not completely unplugged this month (and it's ridiculously addictive), there's usually some activity over on the meals in a snap facebook page.
I hope all of you have a fabulous rest of August and I look forward to cooking simple, healthy, family-friendly meals with you all again in Sept!
Monday, August 8, 2011
homemade egg sandwiches with pesto
 So....I wouldn't say that I am exactly relaxed, nor am I refreshed. I think I was mid-way through our 5th year at family camp, but suffice it to say that re-entry with a sick little one is no fun.
Pair sleep deprivation and day time worry with the fact that no one is making my three meals a day, and well, that explains the fact that I am a tad disillusioned. I did, however, nail our first breakfast back: homemade egg sandwiches that were both comforting and delicious made with what we had on hand when we returned home:
whole wheat English muffins
eggs, fried or poached
Gouda cheese, sliced thin
pesto (I have a new food crush on these LeGrand packs of pestos and sauces)
 Since the photo above doesn't look like much, here's a peek inside to the gooey deliciousness...
Subscribe to:
Posts (Atom)


