Showing posts with label cookies. Show all posts

Sunday, February 24, 2013

food crush: nothin' but granola cookies


I realize that my last post was about a cookie... and a crush. Really, we'll get back to savory stuff soon. And I promise to stop swooning over sweet things. I promise. But in the meantime, I must share this little find because it is soooo good. (And we all know that when something delicious, easy, and made with real ingredients, there's a high likelihood that I'll develop one of my crushes...)


Just about every Saturday, we drive several hours to ski. 


And while this makes our Saturday outings look very sexy/dramatic, the normal gig is: waking up really early... quickly popping a hearty breakfast of something I made ahead like protein pancakes or a frittata down 4 hatches... assembling a picnic lunch... piling the kids and all of our season rental ski equipment into the car.... and driving several hours with my 6-year-old dictating what we'll listen to on the radio. Because the food at the local mountain is pretty nasty (unless you're a fan of blue sports drinks, chicken tenders and hot dogs), I load up on healthier, yummier options. 


So, yesterday, I popped a box of these "granola cookies" into our vittles bag, alongside Hint waters, homemade wrap sandwiches, Walter Stewart's Market's wheatberry salad, carrots, apples, cucumber slices, clementines, Deep River chips and Odwalla smoothies.


I'd love to say I had the time-- or interest-- in baking homemade cookies before this weekend's adventure. But I didn't. My 10th birthday cupcake baking on Friday zapped me of all my baking energy for the week, maybe month. So, these were the perfect treat. Made with: almonds, rolled oats, 72% dark chocolate, honey, coconut oil, organic sugar, olive oil, oat flour, water, vanilla, sea salt, espresso powder and cinnamon, this box of about 14 little nuggets is crush-worthy, don't you think?


Oh, and they were enjoyed again today at my "graduation celebration". Yes, yours truly is officially a certified health coach focused on helping you feed your family well. Not so different than before, just a little more educated!

Follow-up: Ha! See, this is why my crushes are so fabulous. Remember that LPQ granola bar I told you about a while back? Same maker as these granola cookies!! I knew the name sounded familiar. See, I know a good thing when I eat it. Stick with me kids.... 

Tuesday, November 27, 2012

what kind of cookies should we bake first this year?


Wayfair.com and Peapod.com sent me a little package today, filled with supplies to get our holiday baking off to a festive start. Needless to say, on a wet-snowy-rainy-icky afternoon, coming home to a package on the stoop was super exciting for my kids. (OK, fine, for me too.) 


One thought we'd been gifted a puppet, that just needed a face...


The other excitedly transformed the cardboard box into a rocket ship. Yes, people, that is a rocket ship.


Tell me I lack imagination, but I was thrilled with the actual contents. Now we just have to figure out what to bake! Our holiday go-to's are always: Gingerbread, Iced Sugar Cookies, and last year we whipped up these demure-looking Orange Cardamom Cookies that were amazing. I also love the Cranberry-Pistachio Biscotti we made a few years back. What's your favorite holiday cookie? I'm always looking for new ideas, so link up your favorite recipe here in the comments, and maybe we'll start the baking season off with a batch of your family's favorite!

Friday, May 11, 2012

sweet (clean-eating) treat: jam thumbprint cookies (gluten, dairy, refined sugar free)


I ran into a mom friend at the supermarket today who mentioned that she'd recently gone gluten-free. She was about to head home to try baking a treat with her son, and I promised to share a recipe from my recent "clean eating" week that I knew she would enjoy. As I mentioned a few days ago, I successfully did a 7-day "clean eating detox" (to be clear, this was nutritious food, not just juice), and took my family along for the delicious, healthy ride. My goal was to lighten up, figuratively and literally, but I didn't want to cook two different meals. It took some creativity, but I created 7 days worth of delicious "clean" family-friendly meals. This was the only sweet treat I made all week, and it won rave reviews. In fact, since then, I have made another batch because they are so yummy-- in addition to be relatively "good for you" as far as treats go.

Jam-Filled Thumbprint Cookies
makes about 2 dozen cookies
(gluten, dairy, egg + refined sugar free)

1/2 cup coconut oil
1/3 cup maple syrup*
2 cups raw nuts of choice (I used 1 C walnuts + 1 C almonds)
1 1/2 cups arrowroot powder
3 Tablespoons cinnamon (optional)
dash of sea salt
about 1/2 cup 100% fruit jam (I used Dalfour brand)


Preheat oven to 350. Line baking sheets with parchment paper. Melt the coconut oil to room temp. Cream the coconut oil and maple syrup (or other sweetener) together using a mixer. In a Cuisinart, process the nuts until they are a fine meal. Add the arrowroot powder, cinnamon and salt, then pulse to combine all dry ingredients. Blend the dry ingredients into the oil/syrup mixture. Batter will still be kind of crumbly, but it will come together in your hands as you shape 24 (or so) balls of dough and place them on the cookie sheets. Using your thumb (get it, thumbprint cookies!) make a divot in each ball of dough, then fill with a dollop of jam. Bake for 12 minutes, or until edges are lightly browned. Store in an airtight container for up to 5 days.

*I used maple syrup as the sweetener, but you could substitute agave or raw honey, if you are looking for a sweetener with a lower glycemic index.  Here is the recipe in action, for those who like to follow along visually:


After melting the coconut oil a bit from its' solid state, I creamed the coconut oil and maple syrup (or other sweetener) together using a  hand mixer. 


In a Cuisinart, I processed the nuts until they were a fine meal. 


Then, I added the arrowroot powder, cinnamon and salt, and pulsed it a few times to combine all of the dry ingredients.


Then the dry ingredients were blended into the oil/syrup mixture using my hand mixer. The batter was still kind of crumbly, but it came together in my hands as I shaped 24 (or so) balls of dough and placed them on the parchment lined cookie sheets.


Using my thumb (get it, thumbprint cookies!) I made a divot in each ball of dough, then filled with a dollop of jam. (I made half of them strawberry and half of them apricot.) Then I baked them for 12 minutes, or until the edges were lightly browned.


They will store well in an airtight container for up to 5 days... if they last that long! Hope your family enjoys these cookies as much as my family did!
Thursday, February 9, 2012

sweet heart cookies


I baked a big batch of heart-shaped sugar cookies the other night and froze them in anticipation of both children having friends over to play yesterday. (It was supposed to be grim weather, but I think my (fabulous) snow day activity pinboard is keeping winter at bay this year...nice.) Anyway, I hemmed and hawed and bookmarked all of these healthier options for my older son's class snack...but the cookies were already made and if you ask two 8-year-olds and two 5-year-olds if they'd like to decorate the cookies and put them back into the freezer for next week and make a healthier snack for tomorrow, I'll let you guess the answer. So, delicious homemade cookies went into school today, balanced out with two red fruit and veggie snacks: bell pepper slices and mini red fruit skewers.


If you've been reading my blog long enough, you know that I love to let my kids get in on the decorating action-- as long as there's a rimmed baking sheet handy. I am only so loose, you know...


I picked up a bunch of India Tree sugars and natural decorating colors at our local market. They are pricey, but the beet juice (which makes the red gel red) cannot be beat in terms of ingredients and creating a gorgeous pink.


Cut-Out Sugar Cookies

2 sticks of butter, softened
1 cup of white sugar
1 egg
2 teaspoons vanilla
Zest of 1 lime (or orange or lemon, optional but adds nice flavor)
2 ½ cups all-purpose flour
1 teaspoon baking powder

wax and parchment paper
rimmed baking sheets

In a mixing bowl, combine softened butter, sugar and egg. Using a hand mixer, beat at medium speed, until creamy. Add the vanilla and citrus zest; mix well. Reduce speed to low; add flour and baking powder. Beat until well mixed.Divide dough into thirds. Wrap each in wax paper and refrigerate until firm (2 to 3 hours). 

When you are reading to do the baking, preheat oven to 350°F.* Roll out dough on lightly floured surface, one-third at a time (keeping remaining dough refrigerated), to 1/8- to 1/4-inch thickness and then cut with your favorite cookie cutters. Place 1 inch apart onto a parchment lined baking sheet. Bake for 6 to 10 minutes or until edges are lightly browned. For best results, let the cookies cool before decorating.

*If you are not up for rolling and cutting out shapes, simply roll small balls with your hands (flattening them slightly so they don’t roll all over when you’re walking to the oven) and place them 1” apart on the baking sheet. Then bake 8-10 minutes, until edges are lightly browned.

Royal Icing (great for decorating cookies)Keep in mind that this frosting needs to be used immediately or stored in an airtight container as it hardens quickly when exposed to air! I make each child a zip-loc baggie of frosting, squeeze all of the air out, and then cut a tiny hole in one corner, so it’s their own “pastry bag”. This frosting can also be colored with food coloring, or the food coloring gels available at most markets.

4 cups powdered sugar 
3 tablespoons meringue (egg white) powder 
1/2 teaspoon vanilla or lemon extract (optional)
1/2 - 3/4 cup warm water (add the water until desired consistency)
I mix by hand, adding liquid until I reach the desired consistency—not rock hard, but not too runny either. Keep in mind that if you’re adding food coloring, that is a liquid too so you’ll want to add it before pouring in all of the allotted water to avoid the frosting getting too runny. Runny is still tasty but it’s messy, and takes a loooong time to harden!

Tuesday, February 7, 2012

Valentine's treats and class snack ideas


Valentine's Day is on the horizon. Which, of course, means that I need to save me from myself. I volunteered to bring the class snack for my 3rd grade child's class and their 7th grade "buddy class" at the end of this week, which means I am a week early planning a Valentine's-themed school snack... and you all will have plenty of time to peruse some ideas before next week. I was up baking a double batch of heart-shaped sugar cookies last night, in anticipation of a fun diversion for the kids who are both having friends over to play tomorrow. We'll freeze the cookies for next week, though I'm not sure which child's class will be the lucky recipient of these after they're decorated? The buddy gathering this week is a morning affair, and something tells me that sending decorated sugar cookies in-- while cute and unanimously enjoyed-- might not go over well with the teachers who then have to peel the kiddos off the ceiling. A quick perusal of the post I wrote around this same time last year gave me some good ideas for special meals at home. And then there was the reminder that when I tried to be supermom last year, I baked with salt instead of sugar. Seriously. So, anyway, given my track record, I should probably just go buy some red foods like a watermelon and some dried cranberries and call it a day, but you know me. So, here's my round-up of Valentine's-themed school snack ideas and sweet treats (click the photo to go to that particular recipe):


berry and cream cheese pinwheels


mini yogurt parfaits made with red berries and strawberry or raspberry yogurt


a mini-version of my fruit skewers made with watermelon, strawberries, raspberries and red grapes


this heart-shaped scone recipe is excellent-- achem, when made with sugar, not salt


or my blueberry-yogurt muffins can also be made with frozen or fresh raspberries or cranberries 
to make them red and "Valentine's-themed"


I've also been querying readers over on my FB page and looking at some of my favorite blogs to see what other great ideas are out there. Here are a few that caught my eye:

Whoa. A lot of sweet treats to consider. On to savory ideas...

Tuesday, December 13, 2011

orange-cardamom cookies

I am one of those people who tears recipes out of magazines and let's this enormous pile amass on my desk. Then, a few times a year I go through the pile and I neatly file the recipes into these (totally type-A) binders in my home office...and then I usually forget to go look at the binders, until the next time I am busy filing a stack of recipes. This recipe, however, stuck in my mind and I did go dig it out of the office last night. With cooking I just wing it, and come up with my own recipes. Those of you who bake know you can't wing it. This probably explains why I don't call myself a baker any other time except Christmas...Anyway, I made these last night and they are amazing. Think dense shortbread-like cookie with the flowery, Indian taste of cardamom alongside the zest of orange. Not too sweet. Perfect with a cup of tea. An adult cookie.

Here are the caveats:
  • This recipe is a lot more work than I usually like to spend on a recipe (unless it's my go-to gingerbread or a batch of traditional sugar cookie cut-outs around Christmas). If you're looking for a quick cookie, skip this one.
  • I love the taste of cardamom, but give the spice a sniff before you make a double batch to make sure you like it too!
  • These cookies aren't going to elicit a lot of oohs and ahhs on a cookie exchange table...they're simple: round and white, flecked with a bit of orange zest and a drizzle of royal icing if you add that. That said, they pack a lot of interesting flavor into their demure appearance.
Assuming you are undeterred by my caveats, let's go! I'm reprinting the Gourmet recipe here + giving you a few pictures of the recipe in action, so you have everything in one place:

Orange-Cardamom Cookies
(makes 2 dozen cookies)

2 1/2 cups all-purpose flour
zest of 2 large oranges
1 1/2 teaspoons cardamom (ground)
1 teaspoon salt
2 sticks unsalted butter, softened
3/4 cup sugar (I used Turbinado)
1 egg yolk
2 Tablespoons heavy cream
parchment paper

Royal Icing (optional):
1 cup powdered sugar
1 Tablespoon powdered egg whites
1/2 teaspoon vanilla
1/4-1/2 cup warm water

To make the dough:
Mix flour, orange zest, cardamom and salt. Beat butter, sugar, yolk and cream with a hand-mixer until well blended and fluffy. At low-speed, mix in the flour until dough forms. It will be very granular. Split the dough into four portions and wrap them in parchment or plastic wrap and store in fridge until firm (about 2 hours).

To bake the cookies:
Preheat oven to 350. Roll out 1 piece of dough, in between 2 pieces of parchment paper until it's about 1/8 inch thick. (You must do it this way. I tried to simply roll the dough on a floured surface and it did not work!! The dough broke apart in a crumbly mess.) Cut dough into circles, using a cookie cutter, and transfer to a parchment lined baking sheet, 1 inch apart. The original recipe says you can only re-roll the scraps once...but I am not much of a baker (or spatial planner apparently), so I definitely did it several more times until all of the dough was cut... Bake for 9-12 minutes, until edges are golden. Cool on baking sheet for a few minutes, then transfer to a rack to cool completely.

If you choose to drizzle with royal icing:
Combine the powdered sugar, egg white powder, vanilla and warm water until desired consistency (should be like thick glue, malleable to drizzle with a spoon or spatula but not runny). Drizzle across cooled cookies. Let icing harden before storing cookies in an airtight container, or freezing a batch.


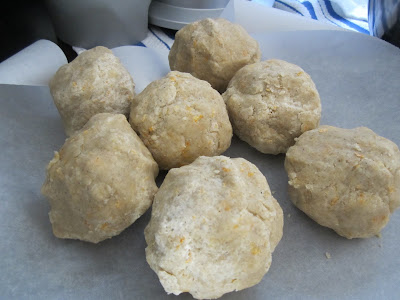
I did not read that the dough was supposed to be pressed into a disk shape before chilling it in the fridge. I made these balls of dough and wrapped each one in parchment paper...but rolling it out would have certainly been easier if I'd made them disks instead! (P.S. That's a double batch of dough you're seeing here.)

So, when it came time to roll, I had to press down on each one to get it into that disk shape before grabbing the rolling pin...

Rolling each ball of dough out first time was tough...

but eventually each ball of dough became a nice, even disk ready to be cut.


While the cookies tasted amazing: not too sweet, full of flavor...they looked a little too plain for a Christmas cookie...

so I did drizzle each one with a bit of royal icing. And that little additional bit of sweetness made them perfect.

kerry's super simple coconut macaroons

My friend, Kerry, told me about these Real Simple coconut macaroons, which she and her children have been whipping up as holiday gifts. I'd never made macaroons, though I do love a good, chewy macaroon. So, last night, we gave these a test whirl. Not only are they delicious, but they are so simple to make...perfect for little hands that want to help!

Real Simple's Coconut Macaroons
(makes 50 teaspoon-sized macaroons)

14 oz bag of sweetened shredded coconut
4 egg whites
2/3 cup sugar
1/3 cup all-purpose flour
1/4 teaspoon of salt
parchment paper
round measuring spoon: teaspoon

Preheat oven to 325. Combine all ingredients in a medium mixing bowl, using a hand-mixer. The original recipe says to "drop packed tablespoonful onto a parchment lined baking sheet". At Kerry advice, we did teaspoonful and they were plenty big, especially since they're so sweet! Bake for 25-30 minutes, or until golden brown. Will store for 7 days in an airtight container, if they last that long.

For extra decadence, you can make them chocolate dipped, though I thought that seemed unnecessary, since they were so delicious as is...


Tuesday, December 14, 2010

Holiday Baking: Biscotti with Dried Cranberries and Pistachios

Last night, after tucking the boys in, I baked the edible portion of this year's preschool teacher gifts. While I am a fan of assemble and then let do its' cooking/simmering thing, a few of my go-to recipes are worth having to be a little attentive during the preparation. One would be my Farro-Butternut Squash Risotto. The other would be these homemade Biscotti with Dried Cranberries and Pistachios. This is a recipe passed on by my mom, who according to the faxed xerox copy which looks like it has made the rounds, originally came from someone named Carolyn Thacker. Not one to necessarily go right for the biscotti on a cookie tray, this recipe made me a biscotti convert, and fan. The cranberries make them a tad bit chewy and the orange and pitachio flavors compliment the cranberries perfectly. Enjoy!

Biscotti with Dried Cranberries and Pistachios

1 3/4 cups all-purpose flour
1 cup sugar
1/2 teaspoon baking powder
1/4 teaspoon salt
1 cup dried cranberries
4 Tablespoons (1/2 a stick) of butter, chilled and chopped
1 teaspoon vanilla extract
1 teaspoon orange extract (optional)
1 1/2 cups shelled pistachios
2 eggs
  1. Preheat oven to 350. Line baking sheets with parchment paper.
  2. In a food processor, combine the flour, sugar, baking powder and salt. Pulse.
  3. Add the dried cranberries. Pulse a few times until they are chopped.
  4. Add the butter and vanilla. Process until the whole mixture looks like a coarse meal.
  5. Add the pistachios and egg. Pulse 10 times to blend. Scrape down sides. Pulse another five to ten times to blend.
  6. On a lightly floured counter, divide the dough into 4 equal pieces. Roll each piece into an 8" log.
  7. Transfer the logs to a baking sheet and flatten to 2" wide with your hand. Bake 25 minutes.
  8. After the first baking, transfer the logs to a cutting board and using a sharp knife and quick single motion, cut on the diagonal into 1/2" slices. Return the biscotti to the baking sheet and bake 4 minutes on one side, then flip them and bake them 4-5 minutes on the second side. Remove from oven when they turn golden brown.
  9. Transfer to cooling racks and cool completely.
Biscotti may be stored in an airtight container for 4-5 days, or frozen in an airtight container for up to 2 months.

Here is the recipe in photos, in case this is your first time baking biscotti:

In a food processor, combine the flour, sugar, baking powder and salt. Pulse.

Add the dried cranberries. Pulse a few times until they are chopped.

Add the butter and vanilla.

Process until the whole mixture looks like a coarse meal.

Add the pistachios and egg.

Pulse 10 times to blend. Scrape down sides. Pulse another five to ten times to blend.

On a lightly floured counter, divide the dough into 4 equal pieces.

Roll each piece into an 8" log. Transfer the logs to a baking sheet and flatten to 2" wide with your hand. Bake 25 minutes.


After the first baking, transfer the logs to a cutting board and using a sharp knife and quick single motion, cut on the diagonal into 1/2" slices.

Return the biscotti to the baking sheet and bake 4 minutes on one side, then flip them and bake them 4-5 minutes on the second side. Remove from oven when they turn golden brown.

Transfer to cooling racks and cool completely. Biscotti may be stored in an airtight container for 4-5 days, or frozen in an airtight container for up to 2 months.