Saturday, December 19, 2009

May All of Your Days Be Merry!

I am signing off until after Christmas (and the week between Christmas and New Years may be spotty, depending upon how much fun we’re having playing outside in the snow/sleet/rain).

I hope that you, and your families, have a wonderful holiday time together.

If any cooking quandaries arise, you might like to scroll down and see some of the recipes/ideas that are indexed on the right. And if there are particular aspects of cooking for your family that you’d like me to help you muddle through in the New Year, please leave a comment below and I’ll do my best to share ideas with you.

Looking back on 2009, and where I am falling on the “mom-a-licious” scale, there are certainly things I plan to do differently in 2010. So, I will look forward to sharing new recipes and ideas for moms trying to do it all, and do it well.

Here’s to a great year ahead!

Wednesday, December 16, 2009

It's nice to be recognized!

Well, now this was a fun thing to learn after my book club friends had left and I was avoiding a kitchen full of wine glasses… The Full Plate Blog has been recognized as a great source of holiday ideas. Thanks Mom2Mom!

(And in case you want to whip up a batch of these gingerbread cookies too, the recipe is right here. Oh, and yes, my 3-year-old wanted to help decorate the cookies above (for his big brother's school snack tomorrow…My book club friends were arriving within the hour. So, click here for a quick refresher on how to stay sane/keep the kitchen somewhat clean, while still letting your child go nuts with the sprinkles...)

Thursday, December 10, 2009

Looking for that perfect gift?

My little one turned three today. His favorite gift? A matching set of child-size snow shovels. One for him, one to share with his brother. For those of you still trying to come up with that perfect holiday gift…this might be it!

Decorating cookies with kids (and, achem, keeping it fun but sane)

Want to include your children in cookie decorating…but having a hard time getting excited about crunching around the kitchen on spilled sugars and sprinkles afterwards? A couple of ideas:

Give each child a rimmed baking sheet as their own little work space;

Spreading frosting with a knife can be frustrating for little ones. I fill a sandwich zip-loc with frosting, and then cut a tiny bit of the corner off, making them their own “pastry bag”;
Pouring sprinkles into small ramekins lets children to grab a little pinch of decorations. Whether your child decides to dump the whole ramekin on a cookie is up to them.

Click here for my favorite gingerbread and sugar cookies, both perfect for decorating.

Wednesday, December 9, 2009

Test run on teacher gifts (9 Bean Soup with Sausage and Kale)

My older son’s school encourages the little ones to make (not buy) holiday gifts for their teachers. In past years, we have made tins of the most decadent candied pecans ever…delicious to eat, but laborious. (And not the kind of labor my little ones can help with since it involves stirring hot, sugary nuts over and over, every ten minutes.) So this year, I was trying to think of a gift the kids could really help make, and that wouldn’t be “screwed up” if my almost three year old wanted to get in on the action. A local friend sent me the most gorgeous photos from her child’s Montessori service day, where the children gathered to assemble bean soup mixes for families in need. The jars were pretty to look at, I know they are good to eat, and if a teacher is inundated with baked goods and hand-painted mugs at holiday time, this could be a nice alternative—particularly if we make it based upon the delicious bean soup I regularly whip up for my family when the weather gets chilly.

Lots of websites have recipe ideas for 1 quart jars. Fine if you can find 1 quart jars, which I couldn’t. Closest thing to it was a 1.6 quart jar at Container Store. Just keep in mind, that if you find yourself in the same predicament, simply adjust recipes by 1.5.

Last weekend we assembled the jars. The kids scooped away. The beans were flying, and they had a ball. It is impossible to “mess up” this recipe, as all that is required is filling the jar with some assortment of beans. We used kidney, black eyed peas, barley, split peas, lentils, small red beans, black beans, chickpeas, and pinto beans. My older son made sure to get all nine types of beans into each jar, my younger son was more willy nilly, and he was just happy when the beans went in the jar. Needless to say, I bought extra beans since I knew I'd be vacuuming up a lot of beans…

Then I sent my younger one to Starbucks with dad so I could tackle the (more precise) seasoning packets with my older son. Our seasoning packet was made with a teaspoon each (or so) of: oregano, basil, tarragon, thyme, dried onion, chili powder, coarse pepper, dried lemon peel, parsley, garlic powder, and smoked paprika….I learned afterwards that Costco carries an Organic No-Salt Added Seasoning mix, which I would probably opt for next time!
I gave a jar a test run today, as it was my cook day for our Wednesday Supper Swap, and the soup is delicious.

9 Bean Soup (with Sausage & Kale)
1.6 quarts (about 6 cups) of dried beans (any type)
Two 28 ounce can of diced tomatoes (I used ones with garlic and basil)
Two 34 ounce boxes of broth (I used organic chicken broth)
Seasonings/spices of choice (add in stages; you can always add more but not take it out!)
Optional – Sausages (I used Turkey Kielbasa)
Optional – Greens (I used a big bunch of kale)
Soak the beans overnight. The next day, drain and rinse the beans.
In a large stock pot, sauté the sausage in a bit of olive oil. (If this is strictly a bean soup, skip this step.)

Add the pre-soaked beans, enough broth so the beans are covered by about 2 inches of liquid, and 2 cans of diced tomatoes (as is, don't drain them).

Bring to a boil, then cover and reduce heat to low, letting the soup simmer for 2 ½ hours, or until beans are tender. You'll want to stir the soup every 1/2 hour or so, to prevent any beans from sticking to the bottom of the pot.
If you are adding kale (or any other leafy green) you’ll want to do so about the last 15 minutes of cooking.

This soup freezes beautifully, so go ahead and make a huge pot. It’s also a crowd pleaser after an afternoon of sledding.

Tuesday, December 8, 2009

Toy Ideas for Little Ones (Re-Post)

The post about gift ideas for little ones got hidden way way down, many posts ago. A couple of my friends mentioned that they were having trouble finding it, so I am re-posting the link for those of you looking for toy ideas based on ones that have been a hit around here. Enjoy! (And please do leave a comment if you've got neat ideas to share.)

Old-Fashioned Molasses Crinkles (a.k.a Baking in the Dark)


A couple years back, a friend brought these cookies over as a hostess gift. Relatively demure in appearance, I had no idea just how delicious these cookies tasted. They are now on my “must make” list of holiday baking.

If these photos look dark it’s because it was dark when we baked them this morning. My 1st grader decided (at bedtime last night) that what he would really like to “share” at school today is a guessing game. “I want to write down all of the ingredients in something and then let my friends guess what it will make! Then I want to give them all one of the cookies!” How can a mom argue with that sort of glee and excitement?

And that is why we were baking at 6 a.m. I can only assume that my pre-7:30 a.m. actions of having the Make Ahead Oatmeal down their hatches, and a huge batch of cookies baked, will nominate me for a mom-of-the-week award. Then again, the smell of our kitchen when I came back in from waiting for the school bus was reward enough for today.

Old-Fashioned Molasses Crinkles
About 6 dozen cookies

2 cups of sugar
1 ½ cups of shortening
½ cup molasses, “original” (though you can use dark for a stronger taste)
2 eggs
2 teaspoons baking soda
2 teaspoons ginger
3 teaspoons cinnamon
½ teaspoon salt
4 cups of all-purpose flour
Sugar (to roll the dough in)

Mix all of the ingredients above, except the flour. Let batter stand for 20 minutes, and then mix in the flour. Roll into balls the size of hickory nuts (which I estimate to be 1” balls).

Bake at 350 for 10 minutes. Let cool slightly on baking sheet then transfer to cooling rack.

Monday, December 7, 2009

Catching up and keeping things in perspective

I am playing a serious game of catch-up on posts today. I have my little one home from preschool with a sniffle and he’s relishing having our huge tub of Legos all to himself. So, I am homebound, and enjoying the forced downtime during what is usually a chaotic time of year.

As I went in to write up a couple of the most recent recipes on the Full Plate blog, I realized that I had also not glanced at my “dashboard” in a few weeks of happy holiday mayhem. Since I am technologically pretty illiterate, right now I need to actually login to my “dashboard” if I want to catch up on posts from other moms and interesting people out there. One of my all time favorite blogs to read is nienie. Not to sound trite, but whenever I get bogged down in the silliness of my life, her poignant (and often very funny) posts remind me of just how lucky and carefree my life is. Here are a couple of her recent posts for those who have a little downtime and might like to read them too: Nie York City and the very funny Christmas List post.

(The photo above, and the photo below are "then" and "now" photos of Stephanie (a.k.a. nienie) that I copied off her website.)

Easy Appetizer - Savory Christmas Tartlets

I love going to parties. But as a guest, knowing how much planning and effort goes into hosting, I like to contribute an appetizer or some treats. Here’s my holiday take on that easy appetizer I shared a couple months back. It’s a hit.

Christmas Tartlet Appetizers

Phyllo shells (found in the freezer section of most supermarkets)
Cream cheese
Feta
Parmesan
Pesto (I used Bear Pond Farm’s “Lemon Pesto” from Walter Stewart’s Market)
Sun-dried Tomato Paste

Pine Nuts

Preheat oven to 350. Pop the frozen shells out of the plastic tray and onto a rimmed cookie sheet. Bake them for 3 minutes, just so they crisp up.

While they are cooling, in a small bowl, blend the block of cream cheese, tub of Feta, and handful of shredded Parmesan (using a hand mixer to make it easy).* Fill each little phyllo cup with a dollop of the cheese mixture, then a dab of sun-dried tomato pesto (mine came in a tube which made this part super easy...found in the pasta/sauce aisle of Walter Stewart’s), and a dab of pesto, sprinkle with a couple of pine nuts. Then I popped it back into the oven for 5 minutes so the cheese melted a bit.

These were served room temp, and were delish.

*Again, I knew this would make a ton of the cheese mixture. So, we had some in our veggie frittata the next morning, and I plan to enjoy it spread on Wave Hill bread this week.

Jingle Bell Pasta

Here’s a festive dinner (that you can make in mere minutes) this holiday season. Its’ bright colors are a hit…

Jingle Bell Pasta

Ravioli (any kind), or any type of pasta (whole wheat rotini, spinach penne, etc.)
Cherry Tomatoes, washed and left whole
Frozen Peas, cooked according to package
Pesto (store bought,
unless you’ve got homemade in your freezer)
Parmesan, shredded

Prepare the ravioli (or pasta) according to package instructions. Then toss with pesto, peas, cherry tomatoes, and a handful of parmesan. Dinner is ready, and festive!


Holiday Baking - Sugar Cookies and Royal Icing

This is about that time of year when I start letting my kids have Christmas cookies for dinner, and bundle them in winter coats over the PJs so we can turn on Christmas music and drive around town at bedtime to look at all of the pretty lights. No matter how many times a season we do this little evening jaunt it never loses its’ excitement.

I have some of the extra gingerbread cookies (I made last month for a 1st grade project) in the freezer, waiting to be decorated after school this week (preferably the day before the cleaning ladies come versus after). And, I’ve got a couple more holiday favorites I am making time to whip up. In case you’re looking for great cut-out cookie recipes, be sure to check out the gingerbread recipe I posted a couple weeks back. If your family prefers sugar cookies, the recipe below is a great one to keep on hand. And just remember, if you run out of steam, you do not need to kill yourself rolling and cutting them into all sorts of festive shapes. You’ll notice, in the photo above, that I did burn out last year, so I just baked the sugar cookies as balls (that turn into circles while baking), and still they looked festive once the kids piled on the sprinkles! And if you can’t muster up the time to measure ingredients with all of the holiday concerts, parties then just rely on your friend Betty.

Traditional Sugar Cookies

2 sticks of butter, softened
1 cup of white sugar
1 egg
3 tablespoons vanilla
Zest of 1 lemon or orange
2 ½ cups all-purpose flour
1 teaspoon baking powder

parchment paper and rimmed baking sheets

In a mixing bowl, combine softened butter, sugar and egg. Using a hand mixer, beat at medium speed, until creamy. Add the vanilla and lemon or orange zest; mix well. Reduce speed to low; add flour and baking powder. Beat until well mixed.Divide dough into thirds. Wrap each in wax paper and refrigerate until firm (2 to 3 hours).

When you are reading to do the baking, preheat oven to 400°F.* Roll out dough on lightly floured surface, one-third at a time (keeping remaining dough refrigerated), to 1/8- to 1/4-inch thickness and then cut with your favorite cookie cutters. Place 1 inch apart onto a parchment lined baking sheet. Bake for 6 to 10 minutes or until edges are lightly browned. For best results, let the cookies cool before decorating.

*If you are not up for rolling and cutting out shapes, simply roll small balls with your hands (flattening them slightly so they don’t roll all over when you’re walking to the oven) and place them 1” apart on the baking sheet. Then bake 8-10 minutes, until edges are lightly browned.

Royal Icing (great for decorating cookies)
Keep in mind that this frosting needs to be used immediately or stored in an airtight container as it hardens quickly when exposed to air! I make each child a zip-loc baggie of frosting, squeeze all of the air out, and then cut a tiny hole in one corner, so it’s their own “pastry bag”. This frosting can also be colored with food coloring, or the food coloring gels available at most markets.

4 cups powdered sugar
3 tablespoons meringue (egg white) powder
1/2 teaspoon vanilla or lemon extract
1/2 - 3/4 cup warm water (add the water until desired consistency)

I mix by hand, adding liquid until I reach the desired consistency—not rock hard, but not too runny either. Keep in mind that if you’re adding food coloring, that is a liquid too so you’ll want to add it before pouring in all of the allotted water to avoid the frosting getting too runny. Runny is still tasty but it’s messy, and takes a loooong time to harden!

Tuesday, November 24, 2009

A Pre-Thanksgiving (or any Fall evening) Feast: Savory Pumpkin Cannelloni with Sage Cream Sauce


By popular demand, the recipe for Savory Pumpkin Cannelloni with Sage Cream Sauce...

A little background on the recipe: when I had my personal chef service, I prepared Thanksgiving sides for several families in New Canaan and Darien. One year, a client’s family was all arriving the day before Thanksgiving and they wanted a dinner they could simply pop in the oven, so they could enjoy their company…something that would feed a crowd…that kids would eat…but that was still a little gourmet/special, since it was an annual family gathering. That is when I started making Pumpkin Cannelloni with Sage Cream Sauce, which has become an annual pre-Thanksgiving meal at our home too.

This dish is a perfect dinner party dish, or pre-Thanksgiving meal. It freezes perfectly, so you can make it well in advance of whenever you’re entertaining. Yesterday, my son delivered trays of it to teachers at his school, and the feedback is the same as it is each year: “Wow, will you please share that recipe?” And so, without further reminiscing about my last my pre-child career, I now share this fabulous recipe with you. The original was from Caprial Pence, and I have modified it somewhat.

Savory Pumpkin Cannelloni with Sage Cream Sauce(Serves 8, so double or triple according to your entertaining needs—and remember it freezes beautifully so make lots whenever you set aside time to make it!)

Sage Cream SauceI first make this in a large stock pot, and then let it cool while I am making the pumpkin filling.
5 cloves garlic, roughly chopped
2 large shallots, chopped
1 cup of dry white wine
2 cups (or ½ a box) of chicken or vegetable stock
1 cup of heavy cream
1 tub of mascarpone cheese (or you can substitute a block of cream cheese)
2 tablespoons Dijon mustard
1 hearty bunch of fresh sage, chopped
Salt and pepper, to taste


Pumpkin FillingOlive oil
6-8 cloves of garlic, roughly chopped
2 onions, thinly sliced
1 cup dry sherry
4 cups pumpkin puree (2 cans)
1 tub of mascarpone (or you can substitute a block of cream cheese)
¾ cup whole wheat bread crumbs
1 cup shredded parmesan cheese + extra to sprinkle on top before baking
1 cup mozzarella cheese + extra to sprinkle on top before baking
Salt and pepper to taste

Fresh pasta sheets (in Fairfield County they have them at Villarina’s)
To prepare the sauce: In a saucepan over high heat, combine the shallots, garlic and wine. Let the wine reduce down to about ¼ of a cup remaining. Add the chicken or vegetable stock and let that reduce down to about 1 cup of liquid remaining. Add the cream, lowering the heat to medium and let it warm for about 5 minutes (but not boil). Then add the mascarpone (or cream cheese), Dijon mustard and sage and let the sauce simmer until thick and the flavors are well blended. Season to taste and set aside, letting it cool down a bit while you make the pumpkin filling. Season to taste with salt and pepper.

To prepare the filling: Heat olive oil in a sauté pan or fry pan until very warm, and then add the garlic and onion and sauté until they are golden. Add the sherry and reduce it down until there’s about ¼ cup of liquid left (which intensifies the flavor). Take off the heat and let cool a bit. In a separate large bowl, combine the pumpkin, mascarpone (or cream cheese), breadcrumbs, Parmesan and mozzarella. Mix well, then stir in the slightly cooled onions and mix well again. (I like to use a hand mixer since I have usually quadrupled the recipe and my arm would fall off trying to stir it. Plus, my kids love revving up the hand mixer…) Season to taste with salt and pepper.

To assemble the cannelloni: Preheat the oven to 350. Cut each sheet of pasta into quarters. One piece of pasta at a time, scoop a hearty line of filling in the center and roll it up, placing it seam side down in a casserole or other deep baking dish. Once you have rolled all of the cannelloni, pour the sage cream sauce over the top, sprinkle with cheese, then bake until golden brown (about 30 minutes). Let it sit for about 5 minutes before serving.

Pair with a nice green salad, a bottle of wine, and you’ve got a pre-Thanksgiving (or any fall evening special supper) that will make your friends and family swoon.

Hope your friends and family enjoy this special dinner as much as we do. Happy Thanksgiving!

Monday, November 23, 2009

Getting Ready for Thanksgiving - Balsamic & Butter Glazed Carrots

I made a pilgrimage (no pun intended) to Fresh Market in Westport this weekend. The store is lovely. It reminds me of Gelson’s Market, from when I grew up in Southern California. I’d popped in looking for chorizo (which they didn’t have) since I had to go all the way to Villarina’s in Westport to pick up fresh pasta sheets for our annual Pumpkin Cannelloni assembly (which has become a delicious pre-Thanksgiving tradition).

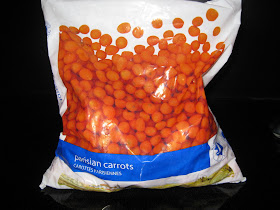
Anyway, Fresh Market did not have chorizo, but my little one and I did meander around and pick up some other neat food items. For example, in the freezer section, they have these bags of White Toque Parisian-style carrots. Hmm, kind of fun to serve an orb instead of a spear! Well, ok, maybe not fun per se. But, it’s something different. I usually go fresh when it comes to veggies, but I think these ones will be great in the carrot side I’m planning for Thanksgiving dinner this year: Carrots Glazed with Balsamic Vinegar and Butter. I’ll try to remember to post a photo once I make the side this year, but I know from years past that this is an easy side that both parents and children enjoy.

Carrots Glazed with Balsamic & Butter
(This recipe is for 10 servings, since I assume you have a crowd coming at Thanksgiving.)

1 stick of butter
3 ½ pounds of carrots (peeled, cut into 2” pieces or you can go pick up your own bag of Parisian-style carrots)
6 Tablespoons of sugar
1/3 cup balsamic vinegar
Fresh chives, chopped


Melt butter in a saucepan over medium heat. Add the carrots and sauté 5 minutes, then cover the pan and cook the carrots until they are crisp-tender, stirring occasionally (about another 5-7 minutes). Stir in the sugar and vinegar. Cook uncovered until the carrots are tender and glazed (stirring frequently), which should be another 8-10 minutes if you were using fresh carrots (and you’ll have to adjust for the small Parisian-style ones, probably half the cook time in each section). Season to taste with salt and pepper. Add chives and toss to blend.

Getting Ready for Thanksgiving - Cranberry-Apricot Sauce

It’s safe to say that I have never been less prepared for an upcoming Thanksgiving meal. I’m not really sure why I am dragging my feet? I love the meal, I love that we gather as a family, and I really enjoy the cooking. But for some reason, I’m just kind of lollygagging around, running non-Thanksgiving related errands, enjoying the nice weather (and maybe secretly hoping that some amazing meal will appear on Thursday). The likelihood that the Thanksgiving fairies are making a stop here is slim to nil, so I did sit down and plan out a menu tonight. And, since I’d been tossing cranberries, sweet potatoes, itty bitty onions, these cool Parisian carrots, etc—the makings of all the traditional Thanksgiving sides—into my shopping cart the last couple trips to the market, I’m in pretty good shape.

Perhaps it’s that my parents fly in tonight, and I want to play with them tomorrow that I was inspired to make one of the two cranberry relishes after I put the kids down. It’s super easy (as in takes minutes), is made with minimal ingredients (which you probably have on hand) and can be made ahead (bonus). I hope you like it as much as we do.

Cranberry-Apricot Sauce
(The recipe below makes about 4 cups, enough to share with a neighbor. Feel free to halve it.)

1 cup of orange juice
1 cup of port wine
24 oz fresh cranberries (2 bags, as they’re usually 12 ounces)
1 cup sugar (I used Sugar in the Raw, but it’s not as sweet as regular sugar)
1 cup dried apricots, cut into slivers or ½” pieces


In a saucepan, heat the orange juice and port until boiling. Toss in the cranberries, apricots and sugar. Stir over medium-low heat for 10 minutes. You’ll see the cranberries pop, and the consistency thicken up as you’re stirring.

Let the sauce cool, and then store it in an air tight container in the fridge until Thanksgiving.

Friday, November 13, 2009

Planning Ahead - Holiday Gifts for Little Ones

Well, while I am in a Christmas state of mind I thought I should also post this list of my kid’s favorite gifts over the years. This posting isn’t at all food related, but it will be a good one for all of us with Full Plates (since it goes without saying that most of us don’t have time to do a lot of shopping). I am pretty sure all of these ideas came from fellow mom friends, so now I share our tried and true favorites with you. Tuck this list away for a month, or you might like to start looking into some of these gift ideas in case there might be any specials on them these next couple of weeks…
Wooden blocks in a rolling tub – there are tons of different sets out there. This intro set with rolling storage chest was a big investment, but absolutely worth it. I wanted high quality blocks (solid maple), a big set (so the kids could get really creative) and a rolling cart (because they are really heavy, and this way we can store them under a coffee table or in a closet). Blocks are totally open-ended and they’ve given my kids years of play.

Popular Mechanics for Kids videos – until my second child was born the TV was never on. How I managed I am not entirely sure? It’s on now, but at least they’ve gravitated towards things like these Popular Mechanics videos, which they both love. The videos are nararrated by a tween boy and girl who take viewers on adventures from lightening to space, sewage to water systems. The three we have are Lightening, Radical Rockets and Slither & Slime and I think my kids would be hard pressed to pick a favorite.

Legos – our little one has an easier time working with the Duplo-size Legos, but now that is big brother has this enormous tub of real Legos, the Duplos are largely untouched. It bums me out that the current sets are all oriented around specific things (Star Wars, etc), but if you’re trying to amass your own collection of bricks for open-ended play I’d recommend visiting local tags sales to pick up bricks. Or, if you go to the Lego site, click on products, then Bricks and More, it will bring you to a section where you can get simple sets of plain bricks.

Art Station – My kids (and their friends when they come over to play) love that I set aside a couple of kitchen shelves for art supplies they can access whenever they want. I use stacking tubs I picked up at Target (the ones with the locking lids and a handle so they can carry them), and I know The Container Store has plenty of other storage ideas for things like: construction paper, glue sticks, pom poms, pipe cleaners, tubes of paint, stickers, small scissors, zig-zag scissors, pens, crayons, colored pencils, beads, yarn, rubber stamps and ink pads, colored tissue paper, tape, a stapler, and miscellaneous recycled things like wine corks, Styrofoam peanuts, paper towel tubes, TP rolls, etc. Often times my kitchen table is taken over by the latest projects, but seeing their creativity in action makes it worthwhile to have to eat at the kid’s table. If you’re short on space, Oompa has a neat carry-all. (P.S. That’s not my kitchen above…that’s a Container Store display. You thought I was really organized didn’t you?)
Musical Instruments - along the same lines as the art supplies, we have a big LL Bean deal bag full of musical instruments that go from quiet tinkering to very loud marching bands through our house. Some of the favorites: recorders, xylophone/glockenspiel, cymbals, drums, shakers, a zither, jingle bells. Most local toy stores sell a selection of inexpensive musical instruments, or you can visit a site like Mary Ann Hall’s Orchestore and select some favorites.

Tool Set – my in-laws created their own one several Christmases ago using a small (real) tool box from Home Depot that they filled it with child-size plastic tools. I like it because ours closes with a latch and can be toted all over the house, but this one on Oompa is eco-friendly, and looks neat too. Some of the recent additions to the toolbox that have been popular: a flashlight, a hadlamp, a real measuring tape and a level…in addition to the hammer, saw, screwdriver, wrench, etc. We have a coffee table in the family room that I do not mind if the kids “work” on. But if your furniture is all precious, then I’d recommend picking up an old end table or something like that that can be theirs to hammer away on.
A Community Playthings red trike – We picked up trikes at tag sales, but before my children could pedal on their own this pedal-free trike was a fun way to scoot around the patio. It’s exceptionally high quality and can be passed from child to child, neighbor to neighbor.

Dress-up costumes – we’ve waned a bit on dressing up, but for several years, this was my son’s favorite thing to do. I stocked a big cupboard with all sort of costumes for them to run around in. With two boys, knights, pirates and dragons were favorites, but the bumblebee, frog, princess, firefighter, wizard, cowboy, lion, and spider saw a lot of action too. Now is the time to stock up, as Halloween costumes are all on sale!


Games – a few of our favorites that both kids can play: Tief Auf Tier stacking game, the Cagola balancing game, and a candy-themed memory game.
Hope this helps give some good ideas. I’d love to hear your family’s favorites too as I start to think of something special for each of the boys this year!

Planning ahead for Christmas – Gingerbread Cookies


The weather is getting a little chilly, the skies are getting a little gray, the Christmas decorations are popping up in local merchants windows… it’s hard not to start thinking about Christmas even if it is only mid-November! I know, I know, there’s still the wonderful Thanksgiving holiday in between but I am the kind of person who likes to get a jump start on the holiday prep so I can actually enjoy the festivities when they arrive. So, a couple weeks back, when I was baking Halloween treats for the 1st graders, I made some extra dough and rolled, cut and baked a batch of gingerbread cookies that I could freeze until Christmas time. No matter what else I decide to bake, I always make these Gingerbread Cookies. I hope you like this recipe as much as I do!

Gingerbread Cookies
Slightly adapted from a recipe by Rick Rodgers, Christmas 101
Makes 6 dozen cookies

(I often double this recipe so I have tons to share with friends!)

6 cups all-purpose flour
2 teaspoons baking soda
2 teaspoons cinnamon
2 teaspoons ginger

1 teaspoon allspice
1 teaspoon cloves
1 teaspoon salt
½ teaspoon of freshly ground pepper
2 sticks of butter, room temp
½ cup of shortening, room temp
1 cup of dark brown sugar
1 1/3 cup unsulfured molasses
2 eggs


The dough must be made at least 3 hours ahead of time, and can be made up to 2 days ahead of time. So, keep this in mind when planning your baking project.

Combine dry ingredients in a bowl (flour through pepper). Set aside.


In a large bowl, cream the butter and shortening, then add the brown sugar, molasses and eggs. Once combined, mix in the flour mixture until everything is combined in a stiff dough. Divide the dough into 4 disks, wrap each in wax paper and refrigerate until chilled (at least 3 hours and up to 2 days).

When you’re ready to do the cutting and baking, preheat your oven to 350 degrees. To roll out the cookies, use one disk at a time leaving the others in the fridge. Roll the dough out on a floured surface, cut with a cookie cutter of your choice and I bake them on a parchment lined baking sheet (lessens clean up, and they’ll never stick). Bake 10-12 minutes, let the cookies cool on the sheet 2 minutes, and then transfer them to wire cooling racks.

These cookies will keep up to 1 week in an air-tight container on the counter, and up to 3 months in an air-tight container in the freezer.

Thursday, November 12, 2009

The day turned a little festive after all

My little one was beyond disappointed that I didn’t buy myself a cake that was big and flowery. “Mama! I wanted to have a FARM cake for your birfday!” he sadly announced as I pulled a ginger cake out of the box, prepared to have a lunch of cake and milk. So much for that decadent idea. He could care less that I was offering up cake for lunch. Whatever he was looking at was b-o-r-i-n-g. “It needs a tractor, Mama. And a farmer. And aminals.” So, while I was catching up with my sister-in-law my little one dutifully went into the playroom and dragged the buckets of people, animals, airplanes, and vehicles into the kitchen.

He then chose 50 or so items he wanted to put on the cake. Thankfully, a stray piece of drizzle distracted him from putting all of the toys on… I must agree that his farm is cake is more fun on this drizzly, weird day. Things are looking up.

Thursday, November 5, 2009

Purplicious & Golden Cauliflower

This idea comes up a lot when parents are talking about their picky-eater children. In our house my kids aren’t picky, they’re just not big eaters (you know the whole thing about the cobbler’s kids….) I am thankful that they’ll eat pretty much anything, but the daily grind of getting them to sit down and eat is, well, a grind. So, I remembered a friend saying-- or maybe I read about it in a magazine, or a book, I can’t remember-- anyway, the idea is to have your child accompany you to the market and pick out a fruit and veggie each. If they have some “ownership” over what’s being served, they might be more likely to eat it. Well, at least one of my children is usually with me at the market so I thought I’d give this a whirl. About halfway down the veggie aisle at Walter Stewart’s the other day, my little one laughed at the brightly colored cauliflower on display. So, we popped a purple and orange head into the cart and went on our merry way. And then I totally forgot it was in our produce drawer, until tonight when my little one who claimed he was too sick to go to school, is hitting an all-time record for inquiring, “Mama? Mama? Mama?” all day long. It’s time to pull out the mealtime excitement! Colored cauliflower! Exciting! (Ladies, I am being facetious here…) But since the color held true after roasting, it was kind of different on the plate…and did get chomped up alongside the regular green broccoli “trees”. One of my kids even asked for more. Bonanza!

Roasted Purplicious & Golden Cauliflower

Preheat oven to 400. Wash cauliflower and chop into 1-2” chunks. Drizzle with a little olive oil and sea salt and toss in a single layer on a rimmed baking sheet (pictured above, before going into the oven). Roast for 20 minutes or so, until it gets crispy edge and is tender…but not soft. No one wants mushy veggies!

That's what it looked like, after roasting. And here's what went down the hatch tonight...a colorful dinner to be eaten with little fingers:

A sample of Roasted Purplicious & Golden Cauliflower + our standard Roasted Broccoli "trees", a scoop of hummus and organic blue corn tortilla chips for dipping, cherry tomatoes, steamed green bean "swords", and some Bell & Evans Rotisserie chicken.